ShopifyJavaScriptCSS
Shopifyのテーマをカスタマイズする場合に商品詳細画面のテンプレート(main-product.liquid)をいちから作ることはほとんどないとは思うのですが、そうはいっても、どう処理しているのかわからないのも気持ちが悪いので試しに再現してみましたのでJavaScript、CSSを掲載します。テーマはDawnです。
2022年8月6日
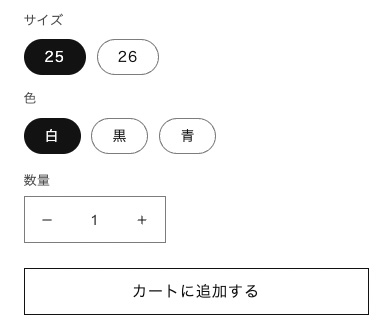
再現したいもの
オプションが複数あった場合のインターフェイスでよく見かけるパターンですね。オプションの組み合わせに応じて画像が変わったり、組み合わせによって価格が変わる場合もありますので価格などとも連動しています。これはどう処理しているのでしょうか。再現してみたいと思います。
・DEMO画面はこちら
main-product.liquidの記述
main-product.liquidを見ると、いろいろごちゃごちゃ書いてあるのでわかりづらいですが、このオプション表示部分を抜き出して簡略化して書くと以下のようになっています。
{%- for option in product.options_with_values -%}
<fieldset>
  <legend>{{ option.name }}</legend>
  {%- for value in option.values -%}
    <input type="radio" name="{{ option.name }}" value="{{ value | escape }}">
    <label>{{ value }}</label>
  {%- endfor -%}
</fieldset>
{% endfor %}

<script type="application/json">
  {{ product.variants | json }}
</script>

<label>数量</label>
<input type="number" name="quantity" min="1" value="1" form="{{ product_form_id }}">

{%- form 'product', id: product_form_installment_id -%}
  <input type="hidden" name="id" value="">
  <button type="submit" name="add">カートに追加する</button>
{%- endform -%}
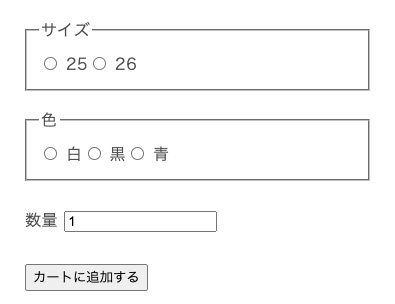
最初のfor文でオプション名(サイズ、色)とその値(25、26、白、黒、青)を取り出しています。その後、JSONデータの取り出しがあって、数量、カートに入れるボタンがありますね。これを CSSを当てずに出力すると以下のようになります。
再現用のhtml
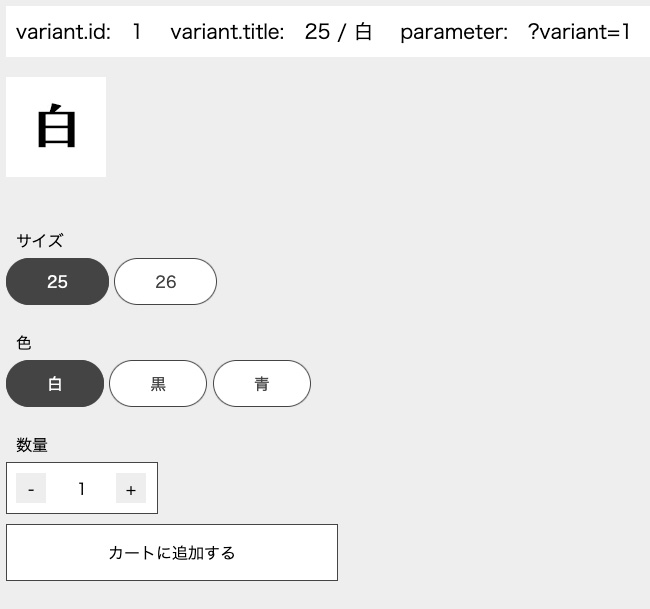
今回、上記と同じものを再現しますので、それ用のhtmlを作りました。JavaScriptで処理するためにidなども付与してあります。オプションの組み合わせによって、variant.id、variant.title、parameterと画像が変わります。
・DEMO画面はこちら
■再現用htmlの記述
<div style="padding: 10px; background: #fff;">
  variant.id: <span id="product-id"></span>
  variant.title: <span id="product-title"></span>
  parameter: <span id="product-parameter"></span>
</div>

<img src="" id="img">

<div id="wrap">
  <fieldset>
    <legend>サイズ</legend>
    <input type="radio" name="サイズ" value="25" id="size-1" checked>
    <label class="radio-label" for="size-1">25</label>
    <input type="radio" name="サイズ" value="26" id="size-2">
    <label class="radio-label" for="size-2">26</label>
  </fieldset>
  <fieldset>
    <legend>色</legend>
    <input type="radio" name="色" value="白" id="color-1" checked>
    <label class="radio-label" for="color-1">白</label>
    <input type="radio" name="色" value="黒" id="color-2">
    <label class="radio-label" for="color-2">黒</label>
    <input type="radio" name="色" value="青" id="color-3">
    <label class="radio-label" for="color-3">青</label>
  </fieldset>
</div>

<label class="number-label" for="quantity-input">数量</label>
<div class="number-input">
  <button class="btn-minus" name="minus" type="button">-</button>
  <input type="number" name="quantity" id="quantity-input" min="1" value="1" form="test">
  <button class="btn-plus" name="plus" type="button">+</button>
</div>

<form method="post" action="/cart/add" id="test">
  <input type="hidden" name="id" value="" id="cart-btn">
  <button type="submit" name="add">カートに追加する</button>
</form>

<script type="application/json">
[
{
"id":1,
"option1":"25",
"option2":"白",
"option3":null,
"title":"25 \/ 白",
"img":"\/images\/white.jpg"
},
{
"id":2,
"option1":"25",
"option2":"黒",
"option3":null,
"title":"25 \/ 黒",
"img":"\/images\/black.jpg"

},
{
"id":3,
"option1":"25",
"option2":"青",
"option3":null,
"title":"25 \/ 青",
"img":"\/images\/blue.jpg"
},
{
"id":4,
"option1":"26",
"option2":"白",
"option3":null,
"title":"26 \/ 白",
"img":"\/images\/white.jpg"
}
,
{
"id":5,
"option1":"26",
"option2":"黒",
"option3":null,
"title":"26 \/ 黒",
"img":"\/images\/black.jpg"
},
{
"id":6,
"option1":"26",
"option2":"青",
"option3":null,
"title":"26 \/ 青",
"img":"\/images\/blue.jpg"
}
]
</script>
CSSについては省略します。興味のある方はDEMO画面のソースをご覧ください。
JavaScriptの考察
基本的な考え方は、
1. オプションの選択をaddEventListenerで検知
2. そのとき選択されているオプションの値を取得
3. JSONデータと照合してvariant.idを特定
4. variant.idに紐付いたタイトル、画像などに書き換える
という感じになろうかと思います。オプションの組み合わせには全て固有のvariant.idが振られているようです。したがって、variant.idが特定できれば、どの商品のどのオプションの組み合わせかがわかります。カートに追加ボタンを押したときに送られるデータも数量とvariant.idのようです。
では、JavaScriptです。
{
  // 書き換える要素を取得
  const productid = document.querySelector('#product-id');
  const producttitle = document.querySelector('#product-title');
  const productparameter = document.querySelector('#product-parameter');
  const photo = document.querySelector('#img');
  const cartbtn = document.querySelector('#cart-btn');

  // JSONデータを取得
  const data = document.querySelector('[type="application/json"]').textContent;
  const from_json = JSON.parse(data);

  // インプット要素を全て取得
  const elements = document.querySelectorAll('#wrap input');
  const len = elements.length;
  elements.forEach(function(element, index){
    // インプットイベントを検知
    element.addEventListener('input', function(){
      // 空にする
      const array = [];

      for (let i = 0; i < len; i++){
        // チェックされているinput要素の値を取得、配列に格納
        if (elements.item(i).checked){
          array.push(elements.item(i).value);
        }
      }
      // console.log(array); →例['25', '白',]
      // 必ずarray[0]がoption1、array[1]がoption2の値になるので
      // array[2]はこの場合はundefined
      // 該当するproductを取得
      const product = from_json.filter( function(variant) {
          return variant.option1 == array[0] && variant.option2 == array[1] && variant.option3 == array[2];
        });

      // 書き換える
      productid.textContent = product[0].id;
      producttitle.textContent = product[0].title;
      photo.src = product[0].src;
      cartbtn.value = product[0].id;
      const newurl = '?variant=' + product[0].id;
      productparameter.textContent = newurl;
      history.pushState('', '', newurl);
    });
  });

  // 画面がロードされた時
  const params = new URLSearchParams(window.location.search);
  // パラメータを持っていなければ
  if (params.has("variant") == false) {
    productid.textContent = from_json[0].id;
    producttitle.textContent = from_json[0].title;
    photo.src = from_json[0].src;
    cartbtn.value = from_json[0].id;
    const newurl = '?variant=' + from_json[0].id;
    productparameter.textContent = newurl;
  // パラメータを持っていたら
  } else {
    // パラメータの値を取得
    const num = params.get("variant");
    // 書き換える
    productid.textContent = from_json[num - 1].id;
    producttitle.textContent = from_json[num - 1].title;
    photo.src = from_json[num - 1].src;
    cartbtn.value = from_json[num - 1].id;
    productparameter.textContent =  '?variant=' + from_json[num - 1].id;
    // 該当するinput要素をチェック
    for (let i = 0; i < len; i++){
      if ((elements.item(i).value == from_json[num - 1].option1) || (elements.item(i).value == from_json[num - 1].option2)){
        elements.item(i).checked = true;
      }
    }
  }

  // 数量
  const minus = document.querySelector('.btn-minus');
  const plus = document.querySelector('.btn-plus');
  const quantity = document.querySelector('#quantity-input');
  minus.addEventListener('click', function(){
    quantity.stepDown();
  });
  plus.addEventListener('click', function(){
    quantity.stepUp();
  });
}
上記46行目以降は蛇足なので、メインとなる処理は9行目から42行目まで。強いてポイントを言うなら、input要素を上から順に調べチェックされている要素(checked)のvalue値を配列に格納しているわけですが(13行目〜27行目)、JSONデータのoption1(サイズ)とoption2(色)と画面上のオプションの表示順は同じなので、必然的にarray[0]がoption1、array[1]がoption2の値になります。ラジオボタンなので各オプション一つしか選択されていないので、各オプションの選択肢が何個になろうとも処理は同じで済みます。
チェックされている値がわかったところで、JSONデータと比較してoption1がarray[0]、option2がarray[1]と同じものを取り出します(31〜33行目)。
const product = from_json.filter( function(variant) {
		return variant.option1 == array[0] && variant.option2 == array[1] && variant.option3 == array[2];
	});
productはひとつしか入っていませんが配列の形で取り出されますので、product[0]にプロパティをくっつけて、product[0].title、product[0].srcなどの形で目的のものを取り出せます。これを使って要素を書き換えればいいでしょう。
productid.textContent = product[0].id;
producttitle.textContent = product[0].title;
photo.src = product[0].src;
cartbtn.value = product[0].id;
const newurl = '?variant=' + product[0].id;
productparameter.textContent = newurl;
history.pushState('', '', newurl);
Shopifyの商品詳細画面はvariant.idに応じてURLにパラメータがつきます。history.pushStateは画面をリロードせずにURLを変更できます。
各バリエーションの在庫数を表示する場合
JSONデータの中身は、上記はかなり簡略化していますが、実際のJSONデータでも在庫の在り無しを表す「available(variant.available)」の項目はありますが、バリエーションごとの在庫数に関する項目「variant.inventory_quantity」はないようです。
したがって、在庫数を表示したい場合は新たに在庫数を読み込まないといけないですね。
<script>
{
{% for variant in product.variants %}
	var stock{{ variant.id }} = {{ variant.inventory_quantity }};
{% endfor %}
}
</script>
これで各variant.idの在庫数が出ますので、あとは、在庫数を表示する要素に対して同様の処理をしていけばいいような気がします。
最後に
ここまでいろいろ書いた後に、つらつらとまたテーマファイルを見ていたら「assets/global.js」に今回処理した内容が書かれているのを発見しました・・・。global.jsの746行目以降です(Dawnの場合)。当然のことながら私が作ったものよりちゃんとした内容になっていますので見てみてください。
Shopifyのliquidファイルの内容は、表示の内容の割にはやたらと記述が多いですね。例えばこのオプション部分についてもプルダウン型とボタン型が管理画面で選べるようになっていますので、それぞれの記述があって記述量が増えるわけです。
初見では記述量が多いのでうんざりしてしまいますが、諦めずに見続けていると少しづつですが理解できるようになってきます。Shopifyについてはまだ初学者の域を出ませんが、これからも研究していきたいと思います。
以上で「Shopifyの商品詳細画面、オプション選択のJavaScriptの処理を考察(初学者向け)」の解説を終わります。
Tweet
