ShopifyJavaScriptCSS
Shopifyでブログをつける(お知らせとかニュースとかではなく)とするならば目的はSEO対策ということになるでしょう。であれば、目次はSEO的にはあった方がよいとされているのでJavaScriptで作ってみたいと思います。テーマはDawn(6.0.2)です。
2022年8月10日
目次の考え方
目次を自動生成するにあたっては
1.<h2>、<h3>を目次化する ※<h3>を目次化するかは管理画面で選べるようにする
2.<h2>が2つ以上の場合に目次を生成(<h2>が1つの場合は目次を生成しない)
3.目次は最初の<h2>の上に自動で設置される
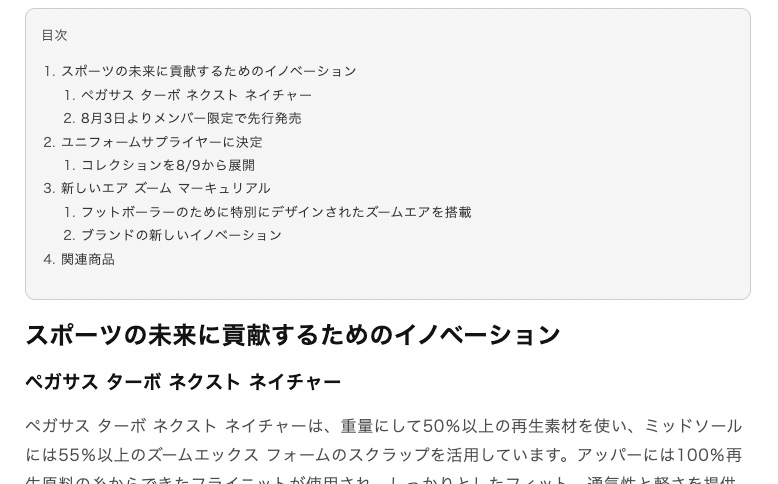
・DEMO画面はこちら
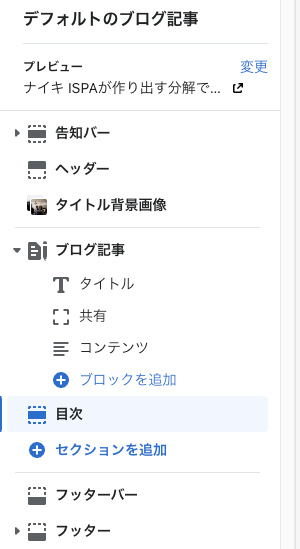
sections/toc.liquidを作成
toc.liquidを新規に作成して、ブログ画面に埋め込めるようにします。main-article.liquidに直接記述してもいいですが、それだとテーマのアップデートがしにくくなるのでファイルを分けておきます。
toc.liquidに書き込む内容は、JavaScriptとstyleとschemaです。
JavaScriptの記述(前半)
まず前半では<h2>を目次化して、後半で<h3>を目次化します。前半では下記のようなhtmlを生成するようにJavaScriptを作っていきます。
<div id="table-of-contents-hole">
  <div id="table-of-contents-title">目次</div>
  <ol id="table-of-contents">
    <li><a href="#エンコードテキスト">テキスト</a></li>
      <ol id="ol1"></ol>
    <li><a href="#エンコードテキスト">テキスト</a></li>
      <ol id="ol2"></ol>
    <li><a href="#エンコードテキスト">テキスト</a></li>
      <ol id="ol3"></ol>
  </ol>
</div>
また、<h2>には下記のようなアンカー用の記述もJavaScriptで埋め込んでいきます。
<h2>テキスト<span id="エンコードテキスト" class="anchor"></span></h2>
ではJavaScriptです。最初に<h2>を取得していますが、ブログ画面には本文以外にも<h2>要素がいくつかありますので(‘article h2’)として本文内の<h2>に限定しておきます。
// h2要素を取得
const h2s = document.querySelectorAll('article h2');
const h2s_len = h2s.length;

// h2要素が2以上の場合、目次を生成
if ( h2s_len > 1) {

const array_h2 = [];

// h2要素のテキストを配列に格納
h2s.forEach(function(element, index){
    array_h2.push(element.textContent);
  });

// 目次の一番外側のdiv要素の生成・最初のh2要素の前に配置
const holeDiv = document.createElement("div");
holeDiv.id = "table-of-contents-hole";
h2s[0].before(holeDiv);

// 目次の一番外側のdiv要素を取得
const table_of_contents_hole = document.getElementById("table-of-contents-hole");

// ol要素を生成
const holeOl = document.createElement("ol");
holeOl.id = "table-of-contents";

// 一番外側のdiv要素の中にol要素を配置
table_of_contents_hole.appendChild(holeOl);

// <div id="table-of-contents-hole">
// <ol id="table-of-contents">
//
// </ol>
// </div>

// ol要素の取得
const table_of_contents = document.getElementById("table-of-contents");

// ol要素の前に「目次」を配置
var parentDiv = document.createElement("div");
parentDiv.id = "table-of-contents-title";
parentDiv.innerHTML = "目次";
table_of_contents.before(parentDiv);

array_h2.forEach(function(element, index){
    // li要素を生成
    const li = document.createElement("li");
    // a要素を生成
    const a = document.createElement("a");
    // テキストをエンコード
    const uri = encodeURI(array_h2[index]);
    // href属性を設定
    a.setAttribute("href", "#" + uri);
    // li要素のなかにa要素を配置
    li.appendChild(a);
    // a要素のテキストを設定
    a.innerHTML = array_h2[index];
    // ol要素の中に配置
    table_of_contents.appendChild(li);
    // h3用のol要素を作っておく
    const ol = document.createElement("ol");
    ol.setAttribute("id", "ol" + (index + 1));
    li.after(ol);
  });

// <div id="table-of-contents-hole">
//   <div id="table-of-contents-title">目次</div>
//   <ol id="table-of-contents">
//     <li><a href="#エンコードテキスト">テキスト</a></li>
//       <ol id="ol1"></ol>
//     <li><a href="#エンコードテキスト">テキスト</a></li>
//       <ol id="ol2"></ol>
//     <li><a href="#エンコードテキスト">テキスト</a></li>
//       <ol id="ol3"></ol>
//   </ol>
// </div>

// h2要素にアンカー用記述を追加
h2s.forEach(function(element, index){
    const anchor = document.createElement("span");
    element.appendChild(anchor);
    const uri = encodeURI(array_h2[index])
    anchor.setAttribute("class", 'anchor');
    anchor.setAttribute("id", uri);
  });
// <h2>テキスト<span id="エンコードテキスト" class="anchor"></span></h2>

}
// h2の処理はここまで
基本的には要素を作る(createElement)、要素の中に要素を配置(appendChild)、class・id、href属性をつける(setAttribute)を地味に繰り返しているだけなので、根気よくやっていけばできるかと思います。
JavaScriptの記述(後半)
<h3>を目次化する後半部分は<h2>を目次化する前半とほぼ同じですが、<h3>がどの<h2>に属するのかを判定する必要があります。いろいろなやり方があるような気がしますが、今回は<h2>と<h3>の座標を調べて、各<h3>がどの<h2>の下あるいは上にあるかを調べて処理しています。
// h3を取得
const h3s = document.querySelectorAll('article h3');
const h3s_len = h3s.length;

if ( h3s_len > 0 ) {

  const array_h3 = [];

  // h3要素のテキストを配列に格納
  h3s.forEach(function(element, index){
    array_h3.push(element.textContent);
  });

  h3s.forEach(function(element, index){
    const h = element.getBoundingClientRect().top + window.pageYOffset;
    const li = document.createElement("li");
    const a = document.createElement("a");
    const uri = encodeURI(array_h3[index]);
    a.setAttribute("href", "#" + uri);
    li.appendChild(a);
    a.innerHTML = array_h3[index];

    // h3の座標からどのh2に属するh3かを判定
    for (let i = 0; i < (h2s_len - 1); i++){
      if ((h2s[i].getBoundingClientRect().top + window.pageYOffset < h) && (h < h2s[i+1].getBoundingClientRect().top + window.pageYOffset )){
        document.querySelector('#ol' + (i+1)).appendChild(li);
      }
    }

    if (h2s[h2s_len - 1].getBoundingClientRect().top + window.pageYOffset < h){
      document.querySelector('#ol' + h2s_len).appendChild(li);
    }
  });

  // h3要素にアンカー用記述を追加
  h3s.forEach(function(element, index){
    const anchor = document.createElement("span");
    element.appendChild(anchor);
    const uri = encodeURI(array_h3[index])
    anchor.setAttribute("class", 'anchor');
    anchor.setAttribute("id", uri);
  });
  // <h3>テキスト<span id="エンコードテキスト" class="anchor"></span></h3>
上記の結果として下記のようなhtmlが生成されます。
・DEMO画面はこちら
<div id="table-of-contents-hole">
  <div id="table-of-contents-title">目次</div>
  <ol id="table-of-contents">
    <li><a href="#エンコードテキスト">テキスト</a></li>
      <ol id="ol1">
      	<li><a href="#エンコードテキスト">テキスト</a></li>
      	<li><a href="#エンコードテキスト">テキスト</a></li>
      </ol>
    <li><a href="#エンコードテキスト">テキスト</a></li>
      <ol id="ol2">
      	<li><a href="#エンコードテキスト">テキスト</a></li>
      	<li><a href="#エンコードテキスト">テキスト</a></li>
      </ol>
    <li><a href="#エンコードテキスト">テキスト</a></li>
      <ol id="ol3">
      	<li><a href="#エンコードテキスト">テキスト</a></li>
      	<li><a href="#エンコードテキスト">テキスト</a></li>
      </ol>
  </ol>
</div>
styleとschemaの記述
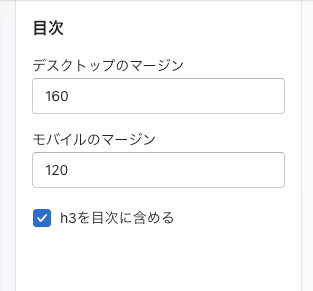
styleでは<h2>、<h3>に打ったアンカーを絶対ポジションで上へずらしています。headerをposition: fixedなどで固定する場合が多いかと思いますが、その分の位置調整です。このずらす大ききは管理画面で設定できるようにしました。
article #table-of-contents-hole { font-size: 1.3rem; border: 1px solid #ccc; border-radius: 10px; padding: 15px; background: #f6f6f6;}
article #table-of-contents-hole ol { padding-left: 20px;}
article #table-of-contents-hole a { text-decoration: none;}
article h2, article h3 { position: relative; font-weight: 700;}
article h2 span.anchor, article h3 span.anchor { position: absolute; top: -{{ section.settings.anchor-margin-desktop }}px;}
@media screen and (min-width:320px) and ( max-width:989px) {s
	article h2 span.anchor, article h3 span.anchor { top: -{{ section.settings.anchor-margin-mobile }}px;}
}
デスクトップマージンとモバイルマージンを入力できるようにしています。また、<h3>を目次に含めるかを選択できるようにしました。これは下記のように<h3>を目次化するJavaScriptの後半部分をliquidタグで囲みました。
{% if section.settings.enable-h3 %}
//
// JavaScriptの後半部分(<h3>の目次化部分)
//
{% endif %}
{% schema %}
{
  "name": "目次",
  "settings": [
    {
      "type": "text",
      "id": "anchor-margin-desktop",
      "label": "デスクトップのマージン"
    },
    {
      "type": "text",
      "id": "anchor-margin-mobile",
      "label": "モバイルのマージン"
    },
    {
      "type": "checkbox",
      "id": "enable-h3",
      "default": true,
      "label": "h3を目次に含める"
    }
  ],
  "presets": [
    {
      "name": "目次"
    }
  ]
}
{% endschema %}
以上で「Shopifyのブログに目次を追加。<h2>、<h3>を自動で目次化するJavaScript(初学者向け)。」の解説を終わります。
Tweet
