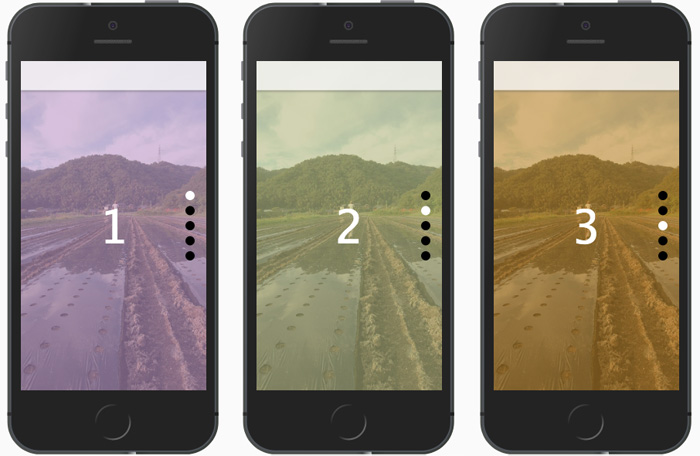
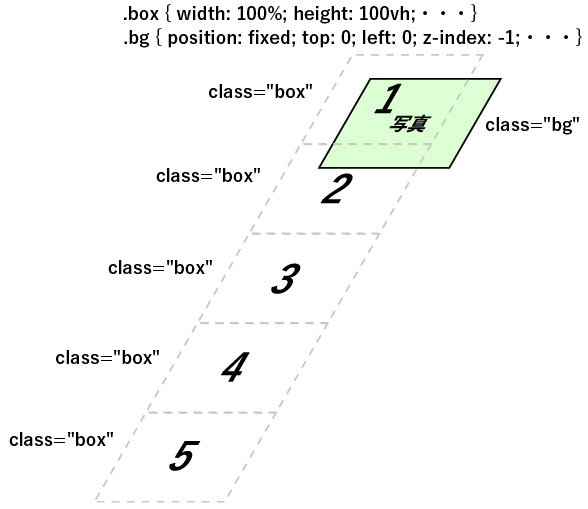
カッコいい系や高級感を出したいときなどに余白を大きくとったデザインをしたくなるときがありますが、そんなときに便利なのがスクロールスナップです。ブロック単位でしかスクロールできなくなりますので、こちらが意図したデザインをユーザーに見せることができます。できるだけシンプルに作ってみます。
2019年8月14日
完成形のイメージ
DEMO画面では背景画像を固定しつつスクロールスナップで5つのブロックが制御されています。ブロックの数だけインジケーターをjQueryで生成し、点灯・消灯やクリックイベントなども設定されています。ブロックの数が変わってもいちいち設定し直さなくてもよいように汎用性を持たせたつくりにしてみたいと思います。
※jQuery版もJavaScript版も考え方は同じですのでjQuery版をもとに解説します。最後にJavaScript版の解説とスクリプトを掲載します。
・DEMO画面はこちら(jQuery版)

html、CSSの記述
htmlの構造は極めてシンプルで5つのブロックに対して共通のクラス(box)を割り当てておきます。これはjQueryでボックスの数を取得するために必要になります。何番目のブロックかを示すクラスも割り当てておくと便利ですが(box01、box02・・・)、これは汎用性を持たせるためにjQueryでクラスを付与することにしますので、ベースとなるhtmlには共通のクラス(box)だけつけておきます。
インジケーターの中身もjQueryで生成しますので、生成する枠だけ作っておいてCSSでデザインをあてておきます。

<div class="bg"></div>
<div class="box"><p>1</p></div>
<div class="box"><p>2</p></div>
<div class="box"><p>3</p></div>
<div class="box"><p>4</p></div>
<div class="box"><p>5</p></div>
<div id="indicator"></div>
.bg { position: fixed; top: 0; left: 0; z-index: -1; width: 100%; height: 100vh; background-image:url('/images/bg01.jpg'); background-position: center center; background-size: cover;}
.box { width: 100%; height: 100vh; display: flex; justify-content: center; align-items: center;}
#indicator { position: fixed; top: 50%; right: 20px; transform: translateY(-50%);}
#indicator a { display: block; width: 16px; height: 16px; background: #000; margin-bottom: 10px; border-radius: 50%;}
#indicator a:last-child { margin-bottom: 0;}
#indicator a.active { background: #fff;}
インジケーターの生成
ではインジケーターの生成からやっていきます。ボックスの数だけインジケーターを作りますので、ボックスの数を取得してfor文でループを回します。点灯・消灯やクリックイベントを設定する際に、何番目のインジケーターかがわかるようにしておく必要があるのでクラスをつけておきます。
$(function() {

	const $boxes = $('.box');
	const boxes_cnt = $boxes.length;
	const $indicator = $('#indicator');
	let indeicatorHtml = '';

	for ( let i = 0; i < boxes_cnt; i++) {
		indeicatorHtml += '<a href="#" class="indicator' + (i + 1) + '"></a>';
	});
	$indicator.html(indeicatorHtml);

});
上記によって以下のようなhtmlが生成されます。
<div id="indicator">
	<a href="#" class="indicator1"></a>
	<a href="#" class="indicator2"></a>
	<a href="#" class="indicator3"></a>
	<a href="#" class="indicator4"></a>
	<a href="#" class="indicator5"></a>
</div>
boxに連番のクラス付与
何番目のブロックかを示すクラスをboxに割りあてておきます。
const $boxes = $('.box');
$boxes.each(function (index, element) {
		$(element).addClass('box' + (index  + 1));
});
上記によって以下のようにクラスが付与されます。
<div class="box box1"><p>1</p></div>
<div class="box box2"><p>2</p></div>
<div class="box box3"><p>3</p></div>
<div class="box box4"><p>4</p></div>
<div class="box box5"><p>5</p></div>
スクロールの上下方向の判定
それではスクロールスナップの実装に入っていきたいと思いますが、まずはスクロールの方向を判定する必要があります。同じに位置でも上向きのスクロールであれば上のブロックの先頭に、下向きであれば下のブロックの先頭に移動しなくてはいけません。
上下方向の判定は、その直前の位置と現在の位置を比較して、直前の位置が現在の位置より上であれば下方向、その逆であれば上方向のスクロールということで判断できます。
const $window = $(window);
// prev_posの初期値(画面をロードしたときの位置)
let prev_pos = $window.scrollTop();

$window.on('scroll', $.throttle(1000/100, function() {
	// 現在の位置
	let current_pos = $(this).scrollTop();

	if ((current_pos > prev_offset) {
		// 下方向の処理
	} else if (current_pos < prev_pos) {
		// 上方向の処理
	}

	prev_pos = current_pos;
}));
$window.trigger('scroll');
下方向か上方向かの判定が終わった後に、現在の位置を直前の位置に代入することで(15行目)、常に上方向か下方向かの判定が可能になります。
スクロールスナップの実装
汎用性を持たせた記述にする前に、box1とbox2の間に位置する場合を例に記述を考えてみたいと思います。
const $window = $(window);
// prev_posの初期値(画面をロードしたときの位置)
let prev_pos = $window.scrollTop();
const box1 = $('.box1').offset().top;
const box2 = $('.box2').offset().top;

$window.on('scroll', $.throttle(1000/100, function() {
	// 現在の位置
	let current_pos = $(this).scrollTop();

	if ((current_pos > box1) && ( current_pos < box2)) {

		if ((current_pos > prev_offset) {
			// 下方向の処理
			$('html, body').animate({ scrollTop: box2}, duration, easing)
		} else if (current_pos < prev_pos) {
			// 上方向の処理
			$('html, body').animate({ scrollTop: box1}, duration, easing)
		}
	}

	prev_pos = current_pos;
}));
$window.trigger('scroll');
これで問題なさそうな気がしますが、実際に動かしてみますとエラーは出ませんが想定通りの動きにはなりません。目標の位置まで一気にスクロールせずに少しずつジリジリと動いていきます。これは少し動くたびに再び11行目の条件判定をしてしまって、それを延々と繰り返すことになるからです。
したがって、一度動き出したら11行目の条件判定は行わないようにすればよいことになります。今回はそのための状態管理用の変数を用意して制御してみたいと思います。
const $window = $(window);
// prev_posの初期値(画面をロードしたときの位置)
let prev_pos = $window.scrollTop();
const box1 = $('.box1').offset().top;
const box2 = $('.box2').offset().top;
// 状態管理用の変数
let flag = 1;

$window.on('scroll', $.throttle(1000/100, function() {
	// 現在の位置
	let current_pos = $(this).scrollTop();

	if ((current_pos > box1) && ( current_pos < box2) && (flag === 1)) {

		if ((current_pos > prev_offset) {
			// 下方向の処理
			flag = 2;
			$('html, body').animate({ scrollTop: box2}, duration, easing, function(){
					flag = 1;
			});
		} else if (current_pos < prev_pos) {
			// 上方向の処理
			flag = 2;
			$('html, body').animate({ scrollTop: box1}, duration, easing, function(){
					flag = 1;
			});
		}
	}

	prev_pos = current_pos;
}));
$window.trigger('scroll');
状態管理用変数(flag)が1の場合のみ13行目の条件判定をするようにしました。下方向、上方向いずれかの処理に入ったらflagを2とします(17行目、23行目)。animateによる移動が終わったらflagを1に戻しておきます(19行目、25行目)。こうすることで想定した動きになります。この変数はインジケーターをクリックしたときのスクロールにも利用します(後述)。
スクロールスナップの実装(汎用型)
前述の記述をベースに汎用性を持たせてみたいと思います。boxの数だけ同様の処理を繰り返せばよいので今回はfor文を使用して書いてみたいと思います。
for (let i = 1; i < boxes_cnt; i++) {

	const prev_offset = $('.box' + i).offset().top;
	const next_offset = $('.box' + (i + 1)).offset().top;

	if ((current_pos > prev_offset) && ( current_pos < next_offset) && (flag === 1)) {

		if (current_pos > prev_pos) {
			flag = 2;
			$('html, body').stop(true).animate({ scrollTop: next_offset}, duration, easing, function(){
					flag = 1;
			});
		} else if (current_pos < prev_pos) {
			flag = 2;
			$('html, body').stop(true).animate({ scrollTop: prev_offset}, duration, easing, function(){
					flag = 1;
			});
		}

	}
}
これでbox1〜box2、box2〜box3、box3〜box4、box4〜box5の領域について定義できました。今回は最後のブロックの領域については何もしないこととします。
インジケーターの点灯・消灯
スクロールスナップの実装ができましたので、あとはインジケーター周りを仕上げてみたいと思います。といっても簡単で、どの位置にいるかで該当するインジケーターにクラス(active)を付与するだけです。for文を用いて汎用的に書いてみます。
for (let i = 0; i < boxes_cnt; i++) {
	const prev_offset = $('.box' +  (i + 1)).offset().top;
	if (current_pos >= prev_offset - 1) { // IE11用に-1
		$('#indicator a').removeClass('active');
		$('#indicator a.indicator' + (i + 1)).addClass('active');
	}
}
インジケーターにクリックイベントを設定
最後にインジケーターにクリックイベントを設定します。クリックされたインジケーターに該当するブロックまでスクロールするわけですが、前述したように変数で状態管理をしておかないと隣のブロックまでスクロールして止まってしまい飛び越していくことができません。animateが終わったらflagを1に戻しておきます。
$indicator.on('click', 'a', function(e) {
	e.preventDefault();
	const offset = $('.box' + ($(this).index() + 1)).offset().top;
	flag = 3;
	$('html, body').stop(true).animate({ scrollTop: offset}, duration, easing, function() {
			flag = 1;
		})
});
最後にスクリプトを通しで掲載します。ご参考ください。
$(function() {
	'use strict';

	const $window = $(window);
	const $boxes = $('.box');
	const $indicator = $('#indicator');
	let indeicatorHtml = '';
	const duration = 500;
	const easing = 'swing';

	// boxの個数
	const boxes_cnt = $boxes.length;

	// インジケーター生成
	for ( let i = 0; i < boxes_cnt; i++) {
		indeicatorHtml += '';
	}
	$indicator.html(indeicatorHtml);

	// boxに連番のクラス付与
	$boxes.each(function (index, element) {
		$(element).addClass('box' + (index  + 1));
	});

	// 状態管理用の変数
	let flag = 1;

	// インジケーターのクリックイベント
	$indicator.on('click', 'a', function(e) {
		e.preventDefault();
		const offset = $('.box' + ($(this).index() + 1)).offset().top;
		flag = 3;
		$('html, body').stop(true).animate({ scrollTop: offset}, duration, easing, function() {
				flag = 1;
			})
	});

	// prev_posの初期値(画面をロードしたときの位置)
	let prev_pos = $window.scrollTop();

	$window.on('scroll', $.throttle(1000/100, function() {
	  let current_pos = $(this).scrollTop();

		// インジケーターの点灯・消灯
		for (let i = 0; i < boxes_cnt; i++) {
			const prev_offset = $('.box' +  (i + 1)).offset().top;
			if (current_pos >= prev_offset - 1) { // IE11用に-1
				$('#indicator a').removeClass('active');
				$('#indicator a.indicator' + (i + 1)).addClass('active');
			}
		}

		// スクロールスナップ
		for (let i = 1; i < boxes_cnt; i++) {
			const prev_offset = $('.box' + i).offset().top;
			const next_offset = $('.box' + (i + 1)).offset().top;

			if ((current_pos > prev_offset) && ( current_pos < next_offset) && (flag === 1)) {

					if (current_pos > prev_pos) {
							flag = 2;
							$('html, body').stop(true).animate({ scrollTop: next_offset}, duration, easing, function(){
									flag = 1;
							});
					} else if (current_pos < prev_pos) {
							flag = 2;
							$('html, body').stop(true).animate({ scrollTop: prev_offset}, duration, easing, function(){
									flag = 1;
							});
					}

			}
		}
		prev_pos = current_pos;
	}));

	$window.trigger('scroll');

});
JavaScript版の解説
jQuery版からの変更点1 スムーズスクロール
JavaScriptでのスムーズスクロールの実装は以下のような記述で可能になります。但し対応ブラウザが限られますのでpolyfillを当てることで主な最新ブラウザに対応させています。
window.scrollTo({
	top: 1000,
	behavior: "smooth"
});
・window.scrollTo - Web API | MDN
jQuery版からの変更点2 Firefox対応
firefoxではスクロールイベントに設定したwindow.scrollToの挙動がChromeやSafari、IEとは少し違うようなので、その部分をユーザーエージェント判定を用いて分岐処理しています。
jQuery版からの変更点3 Safari、IE対応 babelでコンパイル
下記に掲載しましたコードはコンパイル前のコードです(Chrome、Firefoxはこのコードでも動きます)。DEMOではこのコードをbabelでES5にコンパイルしてSafari、IEでも動くようにしています。
・DEMO画面はこちら(JavaScript版)
※動作確認:(Mac)Chrome、Safari、Firefox(Win)IE11(iPhone)Chrome、Safari
{
	'use strict';

	const boxes = document.getElementsByClassName('box');
	const indicators = document.getElementsByClassName('indicator');
	const indicator = document.getElementById('indicator');
	let indeicatorHtml = '';
	const agent = window.navigator.userAgent.toLowerCase();

	// boxの個数
	const boxes_cnt = boxes.length;

	// インジケーター生成
	for ( let i = 0; i < boxes_cnt; i++) {
		indeicatorHtml += '';
	}
	indicator.innerHTML = indeicatorHtml;

	// boxに連番のクラス付与
	for ( let i = 0; i < boxes_cnt; i++) {
		boxes[i].classList.add('box' + (i + 1));
	}

	// 状態管理用の変数
	let flag = 1;

	// インジケーターのクリックイベント
	for ( let i = 0; i < boxes_cnt; i++) {
		indicators[i].addEventListener('click', function(e) {

			e.preventDefault();
			const offset = boxes[i].offsetTop;

			flag = 3;

			window.scrollTo({
				top: offset,
				behavior: "smooth"
			});

			window.onscroll = function() {
				if(offset === window.pageYOffset){
					flag = 1;
				}
			};
		});
	}

	// prev_posの初期値(画面をロードしたときの位置)
	let prev_pos = window.pageYOffset;

	// ページ読み込み時pageYOffsetが0の場合インジケーター1を点灯
	if(window.pageYOffset === 0) {
		indicators[0].classList.add('active');
	}

	window.addEventListener('scroll', _.throttle (handleScroll, 1000/100), false);
	function handleScroll() { ///////

		let current_pos = window.pageYOffset;

		// インジケーターの点灯・消灯
		for (let i = 0; i < boxes_cnt; i++) {
			const prev_offset = document.getElementsByClassName('box' + (i + 1))[0].offsetTop;
				if (current_pos >= prev_offset - 1) {
					for ( let i = 0; i < boxes_cnt; i++) {
						indicators[i].classList.remove('active');
					}
					indicators[i].classList.add('active');
				}
		}

		// スクロールスナップ
		for (let i = 0; i < boxes_cnt - 1; i++) {
			const prev_offset = document.getElementsByClassName('box' + (i + 1))[0].offsetTop;
			const next_offset = document.getElementsByClassName('box' + (i + 2))[0].offsetTop;

			if ((current_pos > prev_offset) && ( current_pos < next_offset) && (flag === 1)) {

					if (current_pos > prev_pos) {

						  if (!(agent.indexOf('firefox') > -1)) {
								flag = 2;
							}

							window.scrollTo({
								top: next_offset,
								behavior: "smooth"
							});

							window.onscroll = function() {
								if(next_offset === window.pageYOffset){
									flag = 1;
								}
							};

					} else if (current_pos < prev_pos) {

							if (!(agent.indexOf('firefox') > -1)) {
								flag = 2;
							}

							window.scrollTo({
								top: prev_offset,
								behavior: "smooth",
							});

							window.onscroll = function() {
								if(prev_offset === window.pageYOffset){
									flag = 1;
								}
				    	};
					}
			}
		}
		prev_pos = current_pos;
	} ///////
}
以上で「スクロールスナップを自作(jQuery版、JavaScript版)」の解説を終わります。
